Improving LED lighting with ESP8226 and custom firmware
This post is a bit out of date. I loved exploring LED control by writing custom software like Lightt, but nowadays I use much better software written by others. I recommend you check out my posts on WLED (great for individually-addressable colour strips like those described in this article) and ESPHome.
Over the last three years, LED strip lighting has become a staple of my desk setup. I like it for a few reasons:
- Strips behind a desk add bias lighting, making it more comfortable to look at a screen at night.
- Strips stuck along the bottom of a monitor provide a work and keyboard light.
- It adds colour to a room, without painting or doing anything permanent.
But there have been some drawbacks this whole time:
- I haven’t settled on a seriously useful control mechanism. I’ve tried an IR remote, but that’s most appropriate for a single zone. I settled on rheostats, which are simple but require physical access.
- Running from a breadbroad means there is always a tangle of wires in the corner of my desk.
- Power supply woes. I’d have an Arduino run from my computer’s USB, then power the strips with separate higher-power 12V and 5V power supplies. The 5V power supply was a computer PSU, which was loud and impractical.
I had been thinking of implementing a WiFi control system for a while, but never really saw how it would fix those last two issues. Then I found this downright amazing board from ElectroDragon, which gave me a lot of hope. I bought three and prepared to level up my Arduino skills for the ESP8266.
The Board
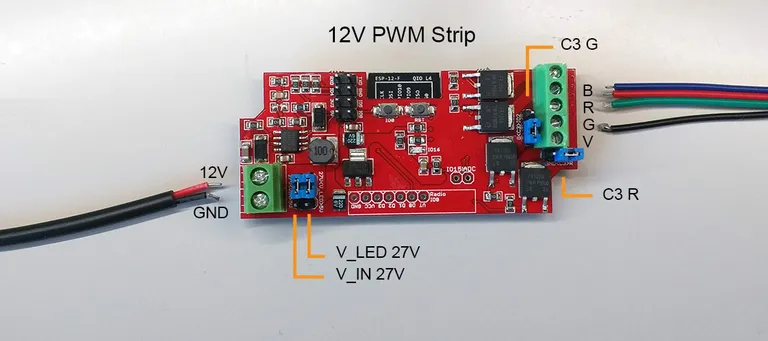
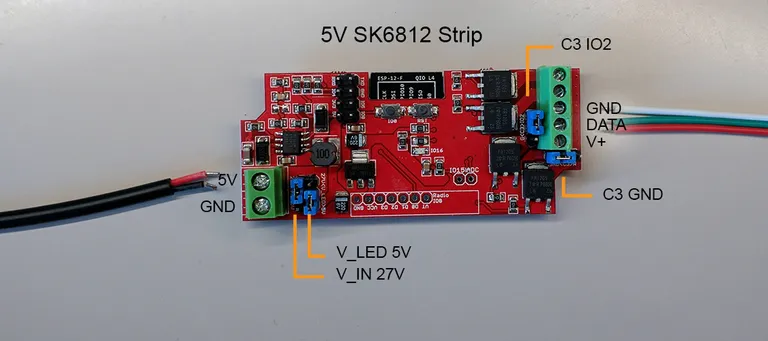
The ElectroDragon ESP LED Strip Board essentially consists of an ESP8266 microcontroller with input terminals for power and output terminals for and LED strip. The coolest part is that it’s designed to be powered with a single supply. Just plug in a power supply to suit your strip, select the correct pin jumper settings and all voltage regulation will be taken care of. The board is a small package and even comes with an injection-moulded enclosure and leads for power input and output. Here’s how I set it up for a ‘dumb’ 12V RGB strip and a ‘smart’ (SK6812) 5V RGBW strip.
Programming an ESP8266
Actually getting code on the ESP8266 is harder than a regular Arduino. It’s surprising how much digging I had to do to find some answers. Here’s the low-down on what I learnt about flashing this chip:
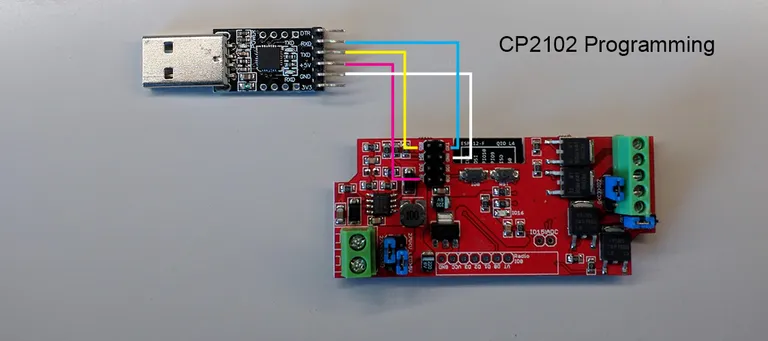
- You’ll need a USB to TTL adapter to program this board and most other ESP8266, as there is not onboard USB port.
- Despite the ESP8266 being a 3.3V board, use the 5V rail to power the ESP LED strip board when the USB adapter is connected. I don’t know why this is the case, but it works a treat.
- The Arduino IDE is convenient for programming this board. You’ll need to install the ESP8266 Arduino core. Once that’s done, I recommend switching to a more powerful editor like VSCode, which can program the board via the Arduino plugin. Check out Lightt’s GitHub page for my board settings which work well for uploading to the ESP LED strip board.
- This one’s important: Unlike most Arduinos, the ESP8266 has to be manually put into programming mode before an upload can happen. To do this, the GPIO0 pin must be connected to ground at powerup. On the ESP LED strip board, do this by holding down the ‘IO0’ button while you plug the USB adapter into the computer.
Here’s what my programming setup looks like with a CP2102 USB to TTL adapter:
All About Lightt
Feel free to clone and flash Lightt (fork and PR too, if you’re keen!). I learnt a ton while making Lightt and it has been a really rewarding undertaking. Here are some key learnings.
MQTT
MQTT is a network protocol which is perfect for IoT. Basically a ‘broker’ runs the MQTT server on your network. I’m using a Raspberry Pi 2 with Mosquitto to achieve this. MQTT works on a publish/subscribe basis. Messages can be published by devices connected to the broker, and each message has content (‘payload’) and a subject (‘topic’). Devices can also subscribe by listening for messages which have a certain topic.
In the case of Lightt, each board has two topics: command and state. The board subscribes to the command topic in order to receive commands from the home automation software. It publishes messages on its state topic to confirm a command has been executed and to regularly let the home automation server know what its current state is.
Message Formats
The board needs to know a command from the server looks like, and also how to format state messages. String processing is a bit of a pain on microcontrollers, so my aim here was to let the home automation server do the processing and keep the messages themselves very structured.
Robustness Never Hurt Anyone
I ran into issues with runtime errors and odd network disconnections which would cause resetting. It turns out the ESP8266 can reset if its loop times become too slow. I fixed the issue by removing delays in the code and instead implementing more robust checkers for MQTT and WiFi connections in the main loop.
Crossfades Are Still Cool
I’m really happy with the crossfade functionality in Lightt. There’s a default 150ms crossfade duration, but this can actually be overridden if a transition is defined in the MQTT command. This allows for some awesome behaviour like 30-minute crossfades for sunrise alarms. More on that in another blog post…
Dimming Curves Are a Thing
Human perception of brightness isn’t linear at all - it’s more logarithmic, like most senses. I implemented a dimming curve for the first time and included a Python helper script. It would awesome to have more than 255 steps to play with, but this is a limitation of the 8-bit colour signal expected by smart strips.
More Experiments to Come
I love being able to program a WiFi-controlled microcontroller. It allows for so many connected, low-power, and out-of-sight projects - and that’s exactly what has made the ESP8266 so popular for IoT projects. The ESP LED strip board in particular has made it possible to run homebrew Arduino-like software without the nest of wires and improvised controls. It looks like the ESP8266 will be driving my desk lighting for the forseeable future, in a project which finally feels finished.